[Out of context from current blog's subject, but thought should share with you; so.....Last night, my brother's system completely crashed and resolved to never work again for 2 minutes at a stretch. Unfortunately poor thing was hit by a deadly virus (unknown of course) a month back (courtesy his best friend who suddenly decided to download a video file packaged with a treat).
We tried everything from setting the Dell Inspiron 1525 to factory settings, blah blah but nothing worked. So ultimately, it was decided that Vista's time is up! Yes!!!! I never wanted to reinstall Vista. hehehe (finally will try slip-streaming). yay!
We collectively agreed on making a fresh install of Windows XP (goo goo goo...); I located one of my old CDs and prayed it would work and yes it did :)
But what is this; as soon as the setup started I got hi by below error: -

"Setup did not find any hard disk drives installed in your computer". I am sure it is one of those old sticky errors that people encounter while downgrading to Windows XP or Windows 2003 Server.
Reason: The system has SATA hard drive whose drivers are missing in Windows XP installation. So what now? I googled and found the way out and this is what I am about to share with you guys today.
We need to somehow integrate the missing SATA drivers with Windows setup files and use it.
Task 1: Find SATA drivers for Dell Inspiron 1525
Luckily unlike my HP laptop, I didn't have a field day locating SATA drivers for above model. Go to http://support.dell.com/support/downloads/driverslist.aspx?c=us&l=en&s=gen&ServiceTag=&SystemID=INS_PNT_PM_1525&os=WLH&osl=en&catid=&impid. Select "Windows XP" from OS dropdown.

and Bingo, all the drivers are located at one good old page. :). As for initial Windows XP installation, all we need is SATA drivers. I downloaded the highlighted one. at times

Download this EXE file (http://ftp.us.dell.com/SATA/R182441.exe). Once downloaded, right-click on it and select 'extract files' (need WIN RAR). Provide a location like "C:\XP Drivers for Inspiron 1525\R166200". At times 'download' button doesn't work. In such a case, replace highlighted text with the value of 'fileID' mentioned in the address bar.
http://support.dell.com/support/topics/global.aspx/support/downloads/en/downloads_splash?c=us&l=en&s=gen&%7Emode=popup&file=238839
Task 2: Install NLITE for creating a new windows XP setup slip streamed with SATA drivers
If you're using non Vista OS like XP, 2k3 to perform slip-streaming go to http://nliteos.pcrpg.org/nlite/nLite-1.4.9.1.installer.exe; for VISTA users http://nliteos.pcrpg.org/vlite/vLite-1.2.installer.exe.
Remember you would need .NET framework 2.0 SP1 as a prerequisite in case on XP, WIN 2K3 and VISTA and an additional AIK Kit (heavy files) for VISTA. I used my server for creating set-up. :). Download and Install NLite/VLite.
Task 3: Slip-Streaming (integrating SATA drivers with Win XP Pro Setup)
Start NLITE. click Next until you reach below screen, Click on Browse button and select the root folder containing WIN XP setup (in CD/ or HDD if again creating a new image with old setup files). once done, you'll again get a screen, where you need to provide the location to extract win XP setup files to. call it - c:\WinXPISO.

Click Next. The setup files will start loading, when the progress bar finishes, you will get below screen.
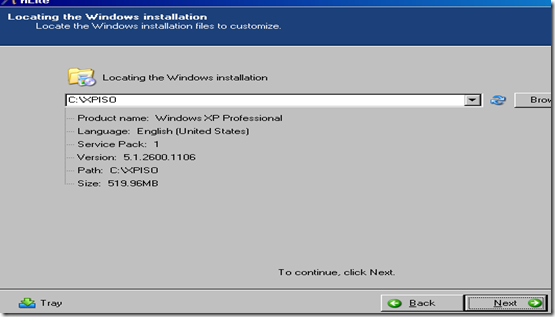
Click Next until you reach below screen. Use 'ctrl' key to multiple select different options. I selected 'service pack', 'drivers' and 'bootable ISO'. Make sure you select at least 'drivers' and 'bootable ISO'. clik Next.

If you selected 'service pack' you'' get below screen. Click on 'Browse' button and locate the EXE for Service Pack (2 or 3) in this case. You can get WIN XP SP2 from here-http://www.microsoft.com/downloads/details.aspx?familyid=049c9dbe-3b8e-4f30-8245-9e368d3cdb5a&displaylang=en and SP 3 from here - http://www.microsoft.com/downloads/details.aspx?FamilyID=5b33b5a8-5e76-401f-be08-1e1555d4f3d4&DisplayLang=en

If you haven't selected service pack option, you'll be presented with below screen. Click Insert. Select 'single driver'.

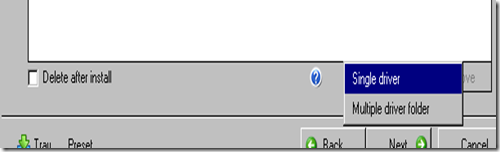
Locate the drivers folder (where you extracted SATA driver files in Task 1).
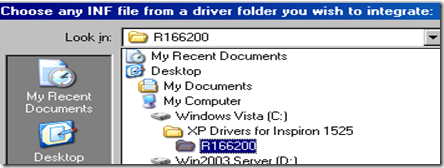
select One of the INF files and click Open, both will be selected anyhow.

select 'textmode driver' option. I selected the following highlighted drivers for my set up. Click on OK.

Click Next. Click Yes upon 'start process?' prompt. Once the process finishes, you've an option to either Burn the new setup files or create an ISO. I chose to create an ISO. select 'create image' and click on 'make ISO' button to start making ISO


Once the ISO is created you can burn the image to a DVD. I used Roxio Easy CD creator. Now that the CD is ready, insert it in the VISTA laptop. I used hairpin to pull the CD tray out and place the CD in it.
On Inspiron 1525, Use F12 to get boot option and select CD/DVD option and proceed. I took the fancy of formatiing and repartitioning the entire HDD since Inspiron 1525 didn't allow more than 1 partition besides System and recovery partition.
Task 4: Get the Missing Drivers for Inspiron 1525
a) Notebook System Software (only for DELL)
http://ftp.us.dell.com/utility/R181862.exe
b) System Software (only for DELL)
http://ftp.us.dell.com/utility/Dell_System-Software_A03_R214472.exe
c) Mobile Chipset Drivers
http://ftp.us.dell.com/chipset/R166187.exe
d) Ricoh Flash Controller Driver
http://ftp.us.dell.com/chipset/R166188.EXE
e) Video Adapter Driver
In order to correctly identify your chipset download chipset ID utility from http://downloadcenter.intel.com/Detail_Desc.aspx?agr=Y&ProductID=861&DwnldID=13799. Mine is Intel GM965 Express Chipset Family.
I recommend searching for latest video drivers/ SATA HDD drivers on Intel rather than Dell -http://downloadcenter.intel.com/default.aspx.
For above mentioned chipset select http://downloadcenter.intel.com/Detail_Desc.aspx?agr=Y&ProductID=2800&DwnldID=17353&strOSs=44&OSFullName=Windows*%20XP%20Professional〈=eng
f) Network Interface Card (Ethernet Controller)
Marvell 88E80XX 10/100 Ethernet Controller at http://ftp.us.dell.com/network/R180046.exe.
g) Dell Quickset (only for DELL)
http://ftp.us.dell.com/app/R174191.exe.
h) Audio Adapter
Sigmatel STAC 92XX C- Major HD Audio Driver at http://ftp.us.dell.com/audio/R180044.exe
i) Modem Driver
Conexant D330,HDA,MDC,v.92,modem at http://ftp.us.dell.com/comm/R167368.exe
j) Wireless Network Card
WLAN driver for Dell Wireless 1395 WLAN MiniCard at
http://support.dell.com/support/downloads/download.aspx?c=us&l=en&s=gen&releaseid=R174291&SystemID=INS_PNT_PM_1525&servicetag=&os=WW1&osl=en&deviceid=9805&devlib=0&typecnt=0&vercnt=1&catid=-1&impid=-1&formatcnt=1&libid=5&fileid=236819.
k) Touchpad driver
http://ftp.us.dell.com/input/R180045.exe
l) Laptop Integrated webcam
This was the trickiest of all. At first I got the error " device driver does not support current OS version". After I installed WIN XP SP 2 I was able to run setup but it always ended in failure. After repeated attempts and trying to make the cam locate drivers using device driver manager somehow 'hardware was properly detected and installed ( magically :))
http://ftp.us.dell.com/input/R165116.EXE
m) Bluetooth
http://ftp.us.dell.com/network/R140135.exe
===============================
Umm...this should pretty much do! Stay tuned for the next blog and your comments are most welcome!